Off the Needles / Cowichan-Inspired Sampler
Have you been following the Fringe and Friends Knit Along? This year Karen Templer chose a Cowichan Style Sweater Vest for the KAL and although all of her panelists are following some version of the same pattern, knitters were welcomed to chose any Cowichan-inspired knit their heart desired. This made for a broad and incredibly inspiring Instagram feed (#fringeandfriendskal2015). Not only are the photos fun to follow but the posts from Karen's hand picked panel of experts are immensely useful and very interesting!
The KAL is frankly so contagious, that you'll want to cast-on something Cowichan immediately! At least that's what happened to me! As soon as I'd stumbled across the projects on Instagram, I couldn't wait for yarn stores to open in the morning so I rummaged through my stash for anything remotely useful to practice colourwork bands with. I found some aran weight Lopi in brown which I held double and some DK weight Diamond Alpaca which I held triple using Karen's awesome cheat (SO clever!!).
Once I'd finished this rough swatch I was hooked! The next day I ran down to the Beehive and picked up one skein each of Briggs and Little Country Roving to do some real swatching.
{ a snapshot of the inside of one of the yokes I knit }
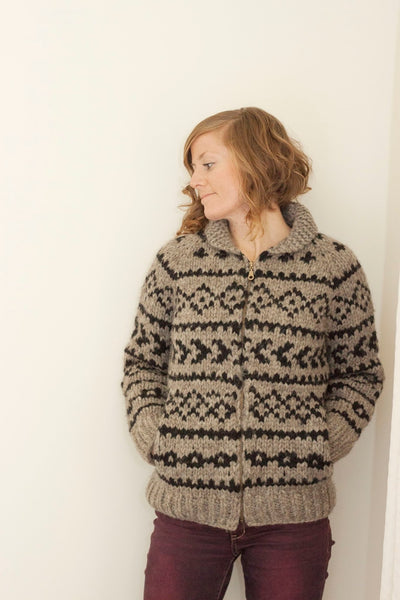
Because I've never knit a Cowichan Sweater before, many techniques were entirely new to me, including stranded colourwork, inset pockets, adding a zipper closure, and knitting a cowichan-style shawl collar. And because I wasn't working from a pattern, all of these different techniques needed to be swatched before making the sweater. Because the yarn was so thick it made the knitting really speedy, which meant I could sample each technique proportionally (rather than making a smaller version or a partial section), this also meant that by the time I was finished with all of my trials I'd basically have an entire sweater! So instead of making seperate swatches to sample each new technique like I normally do, I decided to make a sampler sweater!
I had to knit the yoke 3 times to get it just the way I wanted, and the same with the collar. My cardigan is FULL of big and little mistakes, but it's good enough to pass as wearable and fits me really well which is all I really hoped for. I figured at the very worst it could be a designated camping sweater.
After experimenting with the yoke bottom up I decided to knit from the top-down -- I preferred the way the increases looked. It's also my preferred method, so it felt the most natural to me.
I knew I wanted inset pockets that opened vertically. I experimented with weights for the lining -- knitting one side with 2 strands and the other with 3. I hadn't sewn the linings in yet when these photos were taken... Elsie got a kick out of my "fake" pockets, we'd take turns putting things in them only to have them fall to the floor... it's hilarious to an 8 year old!
I opted not to knit an edging on the pocket so that the colourwork pattern remained continuous. Now that it's finished, I may experiment with edgings, just to see how it looks.
I knew that I wanted a zipper closure like most traditional Cowichans I've seen, which really changed the way I needed to approach the colourwork patterning -- something I learned only after I'd charted, cast-on, and knit half of the body. If you're an experienced colourwork knitter, please ignore how the pattern repeats are broken where they meet at the zipper!!
Sewing the zipper on (one of my big fears) was actually easy peasy! The trickiest part, and one that I'll perfect on my next sweater, is lining up the colourwork on the left and right fronts to maintain continuity (the same goes for the ribbing at the hem, and the top of the zipper where it meets the collar).
I wore my sweater out for the first time this weekend. The temperature has dropped this week and it was the perfect layer to keep me toasty warm! This knit was so much fun and I loved learning so many new techniques, I'm itching to cast-on more Cowhichan-insipred sweaters! There are endless possibilities!!
...Oh and thank you Ysolda for inspiring me to dye my old blue jeans and give them new life! Aren't they fun in Bordeaux!


